Email: tarin@themakeupdiva.net
Website: themakeupdiva.net

Saturday, May 9, 2015

HAUL | Mini Collective Haul | May 2015

Hey guys!
I'm SO SORRY I haven't blogged in such a long time but it has been pure chaos trying to get my YouTube up and a few videos on there. 

If you didn't read my last blog post, I did finally get a YouTube channel. I don't have an official channel name yet... I have to reach 500 subscribers before I can name it, so be sure to subscribe to me so that I can get my channel name OFFICIAL!!
Here is a link to my last blog, which is all about my YouTube: http://makeupbloggindiva.blogspot.com/2015/05/my-youtube-channel.html

Anyway,
this blog is going to be on my mini collective haul.
Without further ado... let's get started!!

If you'd like to read about my mini collective haul, please keep scrolling :)


For all of you that are graphics savy, I have a question! Every time I make a cute graphic (like the one above) for my blogs, I try and make the background white to match the background of my blog. However, it always turns to an ugly off white color and I cannot get it to fix. I've tried to make the background transparent as well to see if that's the case. However it isn't. I save everything as ".jpeg" so maybe that's it?! So if any of you know, please comment below or email me at tarin@themakeupdiva.net :) 

Okay guys, so I first want to say that I have been on a STRICT no buy here lately and have been trying really hard not to buy anything or much of anything. However I do have some items that I just couldn't not get because they were either on sale or I found them marked down and at a really good deal. This haul is very mini because I believe there are only about 6 or 7 items in the entire haul, so as soon as I can I am going to be purchasing more makeup and doing bigger hauls. BARE WITH ME =]

I'm going to go over each individual one, starting... NOW:
The first thing I want to talk about is the Urban Decay Naked Skin Weightless Complete Coverage Concealer | Light Neutral. 

Whenever I first got this, I was mainly going to use it for under eye coverage and places like that. However, the shade I got was too dark for under eye concealer and I mainly like using it before I put my foundation on to cover up blemishes and places like that. It says complete coverage, and let me just say IT IS. I have no negatives about this product so far. All I have to say is well done Urban Decay, you nailed the perfect concealer. MY FAVORITE PART is that it is LIGHT weight, which is exactly what it says.

Next I got the Clinique Beyond Perfecting Foundation + Concealer 2 in 1 | 2 Alabaster. 

I've only used this product a couple times as just a concealer for minor blemishes and so far, so great. I can't really tell how the foundation will be, but I have heard fabulous things about it. I was actually thinking about doing a first impressions, or a product review, with this product. Please let me know if you'd like to see either of those things. :)

Next I got the Clinique Superpowder Double Face Makeup | 01 Matte Ivory.

I got this because I always put a powder over my liquid foundation. So when I got the 2-in-1 foundation, I needed a powder, so I thought I'd try this. Whenever I do my product review or first impression, I will do this with that one if you guys want. Let me know!!

A while back, ELF was having a HUGE sale on their sale items. Basically, they were already marked way down and then you could get another 50% off that, so I splurged. I'm not going to include everything I got in this haul just because I haven't even went through it all yet, but I will show you my most favorite thing I got... the ELF Custom Eyeshadow Singles. Yes, I got every color. And I put them in a Z Palette.
The magnets on the backs of these eyeshadows do not go with the z palette, so you will have to use those little magnets that Z Palette sends with their palettes. If you don't have those, but you have a Z Palette, go ahead and order some. I actually was really excited when I ordered these shadows because I thought that they were gonna stick just like the Morphe shadows, but was highly disappointed when I spent like 30 minutes putting magnets on the back. Overall these eyeshadows are great and super pigmented. I haven't used them without a shadow primer so I'm not sure how great they are without one, but with them they are the bomb dot com for real. I recommend these low cost shadows to anyone.

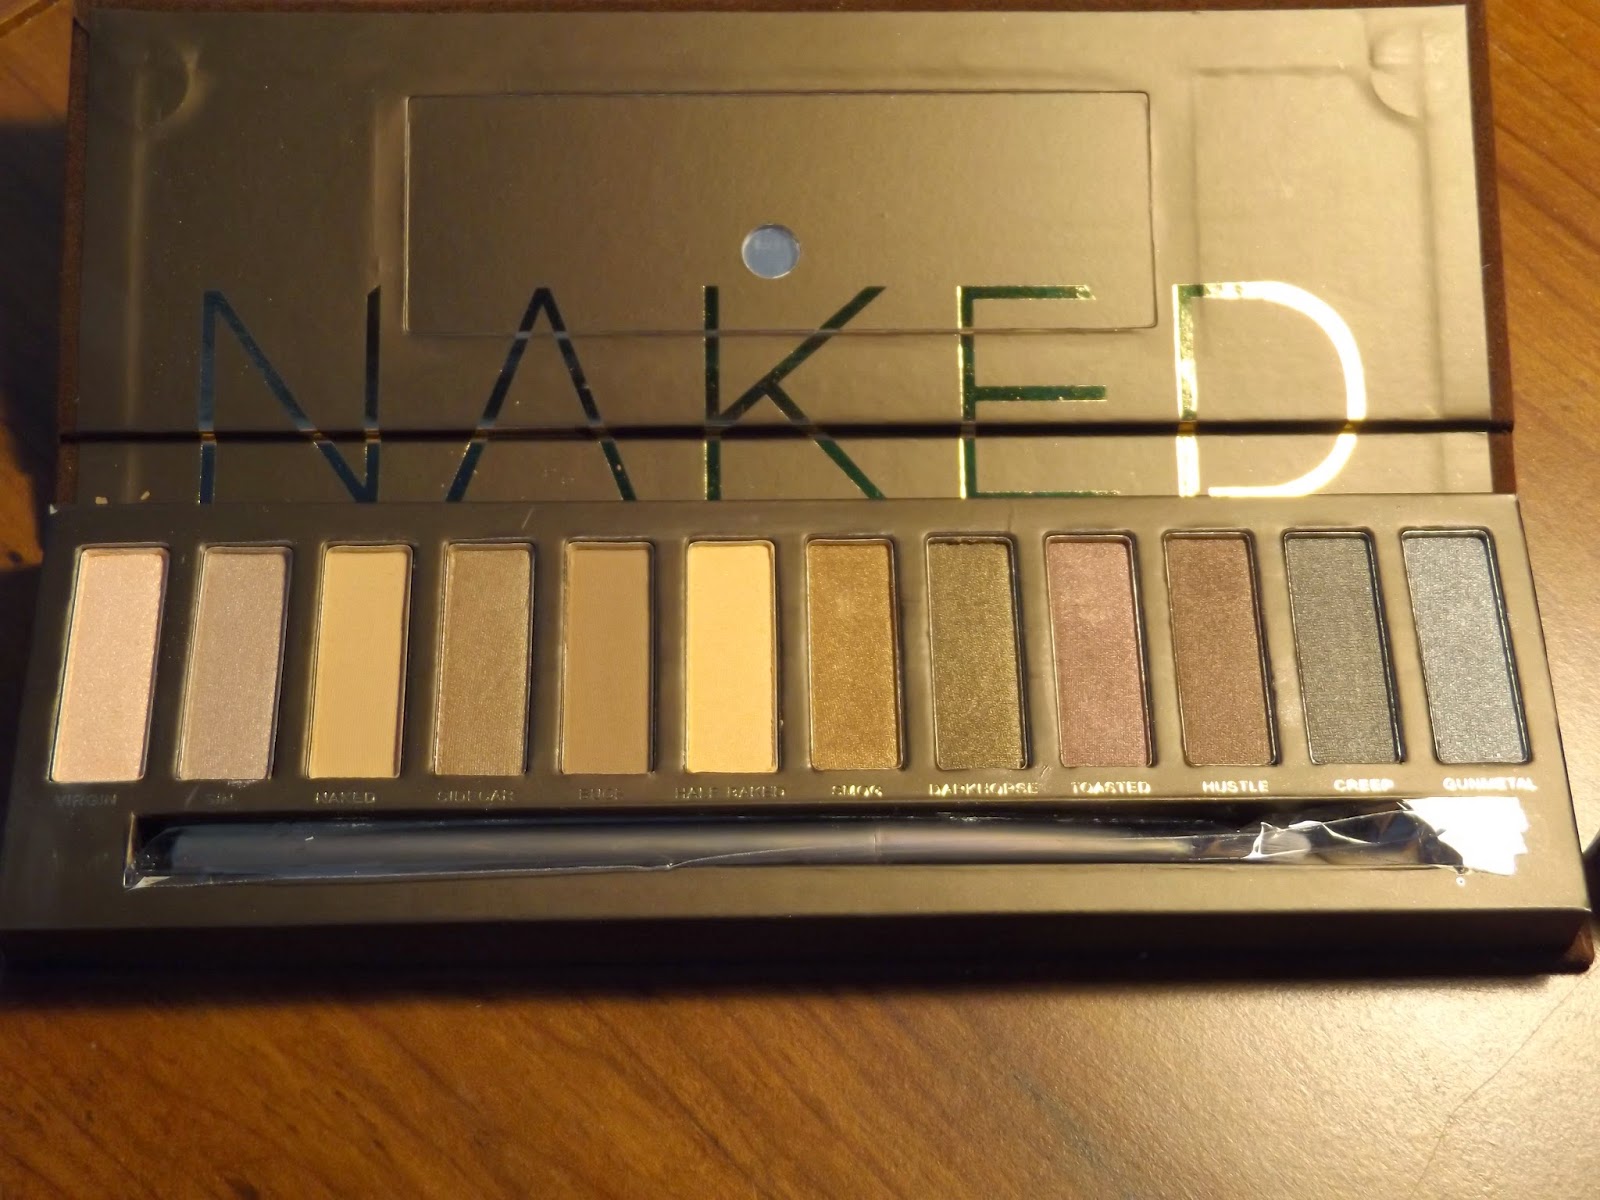
I FINALLY got the Urban Decay Naked1 Eyeshadow Palette... Need I say more?!

These colors are flawless. I'm a huge fan of a neutral eye for on the go and things like that. These colors are SO pigmented and phenomenal. I don't even have fallout no matter how I apply this shadow. PERFECT. It isn't my favorite palette, I still love Naked2. But I'm a huge fan of all three. Once again... GO URBAN DECAY WITH YOUR BAD SELFFF!!

YAS YAS & YASSSS. The final thing I want to talk about is this Jaclyn Hill Favorites palette. Oh. My. God. I'm totally obsessed.
So basically the palette is a collection of Jaclyn's favorite Morphe shadows, which if you watch her videos you know that she loves warm shades, and that is what we have here. It's a very wide variety of colors.. there are a lot of shimmer shades as well as a lot of matte shades, it's kind of even there. There are also a ton of transition shades which I love because transition shades make eyeshadow FLAWLESS. I haven't used this yet, but I have swatched some of them and they're SO pigmented. I do have a lot of Morphe individual shadows and I LOVE them, so I'm excited to use this. If you want a tutorial, let me know.

Alright guys and that's all of the items in my mini collective haul, I told you that I really have been trying not to buy much!! :) I'm proud of myself, haha but I totally miss shopping in make up.

Let me know what other blogs you are wanting to see, and don't forget to check out my youtube channel!


Here is the YouTube video I put up of this same haul: https://www.youtube.com/watch?v=VcuvkHW_PNg

THANKS FOR READING
XOXO

Sunday, May 3, 2015

My YOUTUBE Channel

Hey guys!!
Today's blog is going to be really short.

So if you can't tell from the title, I'm going to tell you guys all about my YouTube channel that I recently started. :)

I started a YouTube channel because I thought it would be easier to show you guys the tutorials that way! Instead of wondering how I got the eyeshadows on my eyes, and how I blend my foundations out, you guys will now be able to see every step of the way!!

Also, I am working on Hauls, collaborations, and more.

But DON'T WORRY! I am still going to be posting blogs and more on here. Speaking of which, comment below and tell me tutorials and other blogs you guys want to see!!

Alrighty guys, so if you want to check it out & SUBSCRIBE TO ME, here is the link: https://www.youtube.com/channel/UC4eONsDEXDdPPOe_M8DQtMQ

See you guys soon!!!

XOXO

Friday, May 1, 2015

SPRING GIVEAWAY!


Hey guys!!
I haven't posted a blog in about a week now but I promise that there are tons of cool new things coming soon, so be sure to keep checking back with me for that!

As you can tell from the title, I am doing another GIVEAWAY!!!!
I am super excited for this one because it is my favorite time of the year, SPRING TIME! These are all Spring Fling items. I picked these up at Ulta not long ago, and thought that they would be PERFECT for a giveway!!!

You can enter this giveaway beginning today, May 1st 2015.

What Do You Win?!
-You will recieve a cute, yellow basket.
-Spring Fling 12 Piece Eyeshadow Palette | Includes 12 Eyeshadows
-Spring Fling Flower Lip Gloss | Includes 1 Flower Lip Gloss
-Spring Fling Brow Set | Includes 4 Brow Powders, 1 Angle Brush, 1 Tweezers, & 1 Spool Brush
-Spring Fling Lipgloss Set | Includes 2 Lipglosses
-Spring Fling Lipgloss Set | Includes 3 Lipglosses


Other information is below:
This giveaway ends on Sunday May 31st.
The winner will be announced Monday June 1st.
Absolutely no giveaway emails / accounts.
Only 1 entry per person.
US only, sorry to all my international viewers. :(
There will be 1 winner.

How To Enter:
There are several ways to enter so just be sure and pick the one that is easiest for you!!!
1. Comment on this blog post below. Leave your name & an email that I can reach you at.
2. Email me at tarin@themakeupdiva.net !! Make sure your subject is something along the lines of "Giveaway Entry" and then in the body, leave me your name and an email to reach you at.
3. On my website, www.themakeupdiva.net I have a contact form that you can fill out, and let me know that you're entering the giveaway with a simple comment in the body.
4. Instagram / Twitter: I am working on those and I will update this portion soon, so stay tuned and for now, enter the other ways.

And that's it!! I'm so excited and I hope you guys are too!!! 

Saturday, April 25, 2015

March / April Giveaway | Winner Announcement!

The time has come!
It is officially time to announce the winner of the GIVEAWAY!!! 

I had a total of 52 entries. I had 20 entries on Instagram, 25 entries on Twitter, 4 through email, and 3 through the contact form on my website.
I didn't think I would get that many, so thanks so much for entering.

The winner of the giveaway receives the following items:
Shiseido Smoothing Eye Mask, Benefit makeup bag, Urban Decay eye shadow primer | Original | Full size, an Elf makeup brush, and an Urban Decay glitter eye pencil. 

The winner was chosen at complete random!


Debbie Martin

Debbie contacted me through the contact form, which is sent directly to my email!


Other giveaways?

I do have a couple other giveaways planned right now, so be sure to keep checking back to see if they're open :)


Thanks!

Friday, April 24, 2015

TUTORIAL | My Go To Look | Neutral Eye | Full Face

NEWS!

Tomorrow the winner from my March/April giveaway will be announced. I will post a blog with the winner's name!!!
------------------------------------------------------------


Alrighty guys,
so this look is going to be really simple because it is my GO TO LOOK!

A lot of people have their signature, everyday looks that they do, so I thought I'd show you guys mine. It's not a signature look or anything, it's actually very plain.

Also, I don't always use all the products I'm showing you guys today. Sometimes I use less products, and sometimes I use different products, such as different foundations.

**Having trouble getting my pictures to be the right way. I apologize and will fix this ASAP.

So if you want to see how I do my go to look, well then, please keep scrolling! :)

Products I'll be using:
Smashbox Primer Water
Maybelline Fit Me Liquid Foundation | Normal to Oily | 120
Maybelline Fit Me Pressed Powder | Normal to Oily | 120
Milani Eyeshadow Primer
Estee Lauder Pure Color Eyeshadow Trio | 05 Gilded Chocolates
Almay intense i-color Eyeliner | 003 Black Pearl
Lancome Hypnose Star | 01 Noir Midnight
Clinique Airbrush Concealer | 04 Neutral Fair
Milani Baked Blush | 01 Dolce Pink
Anastasia Beverly Hills Contour Kit | Light
Lancome Loose Powder | 01 Translucent
NYX Matte Finish Setting Spray


Yes, it's a lot, but like I said, I don't typically wear all of these every day for my go to look. It just sort of depends on the mood I am in and how much time I have to do my makeup.

So lets get started on the look.

The first thing I always do is MOISTURIZE! I can't stress that enough. I do have combination oily skin, but all skin needs to be moisturized. If you have oily skin, I'd recommend getting a moisturizer that is oil free. I put my moisturizer on and then I let it dry completely. It usually takes about 10-15 minutes.

Here's a picture after I did moisturizer, getting ready to start makeup. & yes, I know I look like I'm mad at the world. Sorry haha: 


So for the makeup, I'm gonna prime my face first. And today, I'm going to use the Smashbox primer water. I have literally talked about this in so many blogs, I think. But I'm telling you guys, I love this product a lot.

After I prime my face, I want to do my foundation. I use two foundations always. I use a liquid and then set it with a powder for extra coverage. Today I used the Maybelline Fit Me Liquid & Pressed Powder. Both of these are the Normail to Oily in 120. These are amazing. I wouldn't say full coverage.. probably medium because I can still see freckles and whatnot through it. However you can build it up to full coverage. Also, they are inexpensive which I love. Highly recommend these to anyone. They also have a Normal to Dry kind as well.


& here is my face after applying my foundations:


After I apply my foundation, I move on to eyes because whenever I do my eyes I tend to get a lot of fall out with the eyeshadow, which can mess my under eye area up. I have found it easier for me to do it this way, but whatever works for you :)

To prime my eyes, I used Milani Eye Primer today. I haven't really used this primer, so I can't say much for it. However I do love the Milani line and have recently fallen in love with a couple of the Bella Eye colors.


For my eyes, I use neutrals for my everyday, go to look. I really like the Estee Lauder Eyeshadow Trio in Gilded Chocolates. I love the shimmer and glam it has to it. These eye shadows are also way pigmented and they are very easy to blend. I actually don't have a lot of fall out when using these eye shadows.

So whenever I did my eyes, I took the darkest shade in the outer corner, the medium shade in the inside corner, and in the middle I blended the two colors together really well. I also blended the eye shadows up so there wouldn't be any harsh lines. With the lightest color, I kind of just put it below my eyebrows so the harsh lines from the other shadows wouldn't be as noticeable, and again I blended all that out.

Here's a picture of just the eyeshadow:


For my eye liner, I used a NYC Liquid Eyeliner and the Almay intense i-color in black. 


Surprisingly my cat eye was even enough the first time. I usually have to repeat this step at least 4 times, not kidding.

& then I applied some mascara! I used the Lancome Hypnose Star | 01 Noir Midnight. I did two coats, and curled them with a lash curler.

So after I go back and do retouches and make sure everything is perfect with my eyes, I start on my under eyes, cheeks, contour, and etc.

After I am COMPLETELY done with my eyes, I start on my face again. For my under eyes, I used Clinique Airbrush Concealer | 04 Neutral Fair to get rid of my dark circles and bags. I have big bags under my eyes, so this concealer doesn't hide that, but it does take away my dark circles, and that's my main focus for in the mornings whenever I get up and I'm tired and they're really noticeable. With this concealer, I put it under my eyes, a line down the middle of my nose, make a flower in between my eyebrows (like on the middle of my forehead), chin, and on my cupid's bow.

After I used the concealer, I set it with a powder. For my highlights & contours, I use the Anastasia Beverly Hills Contour Kit | Light. It's by far one of my favorites. The powder doesn't settle into my fine lines or anything like that. And it stays all day. I also used the yellow tone, top middle, to set my under eye area. The reason I used the yellow is because dark circles are purple, so to neutralize them, you need to use a complimentary color. The complimentary color for purple is yellow. & that is the science behind that!

I also used the Contour kit for my contour, obviously. I like to blend all three bottom colors together, or sometimes I just use the bottom left color by itself. The only parts I contour are the top of my forehead and right below my cheek bone.
I typically skip the contour & highlight parts altogether whenever I'm in a hurry or just not feeling makeup that day. So this is not always part of my go to in a hurry look.


Next I just put on some blush that makes my cheeks pop. This time I used Milani Baked Blush in Dolce Pink.
I love the Milani blushes & I'm so OBSESSED with the color that Dolce Pink gives my cheeks. It literally takes me from looking dead to looking like I'm just really ALIVE and well! I know that sounds stupid, but I'm serious. It gives me life. 


After I'm done with everything, I just dab my face with translucent powder and apply NYX Matte Finish Setting Spray. I really like Lancome's translucent powder, so I used that for this look.


& that's it!
I know it was a lot, but that's just what I wore the day that I decided to take pictures for this blog. I normally just do a simple eye liner and no contour.
This normally takes me roughly 10 minutes and with contour and the cat eye, it only takes me about 15 to 20 minutes, so like I was saying, it just really depends on how much time I have.

Here's the final look:


Thanks for reading!!

XOXO
The Makeup Diva
Tarin